

Master the art of perfect makeup with our definitive guide. Dive into the latest unbeatable techniques and expert tips for a flawless look in 2023-2024. Elevate your beauty routine today!
Access Now: https://shrinke.me/XpBSNN
Introduction
The Art of Perfect Makeup is a journey where we unveil unbeatable techniques and insider secrets to ensure your makeup mastery shines in 2023-2024.
Cosmetics isn’t just about applying a range of items to your face; it’s a work of art that requires expertise, persistence, and information on strategies that draw out your best highlights. Becoming amazing at wonderful cosmetics doesn’t come about pretty much by accident, yet with the right direction, it’s certainly reachable.
With regards to the specialty of wonderful cosmetics, knowing the intricate details can be the distinction between a look that compliments and one that crashes and burns. In 2023-2024, makeup enthusiasts and professionals alike are seeking methods that promise not just trends but techniques that guarantee unbeatable results.
Here’s your ultimate guide to mastering the art of perfect makeup, with every stroke, shade, and strategy you need to know.
Essential Tools for The Art of Perfect Makeup
For the Flawless Makeup Application
For the art of perfect makeup, every artist needs their tools, and in the realm of the art of perfect makeup, the precision and quality of your tools are non-negotiable. To transcend every day and reach the heights of flawless application, a meticulously curated selection of instruments is your foundation.
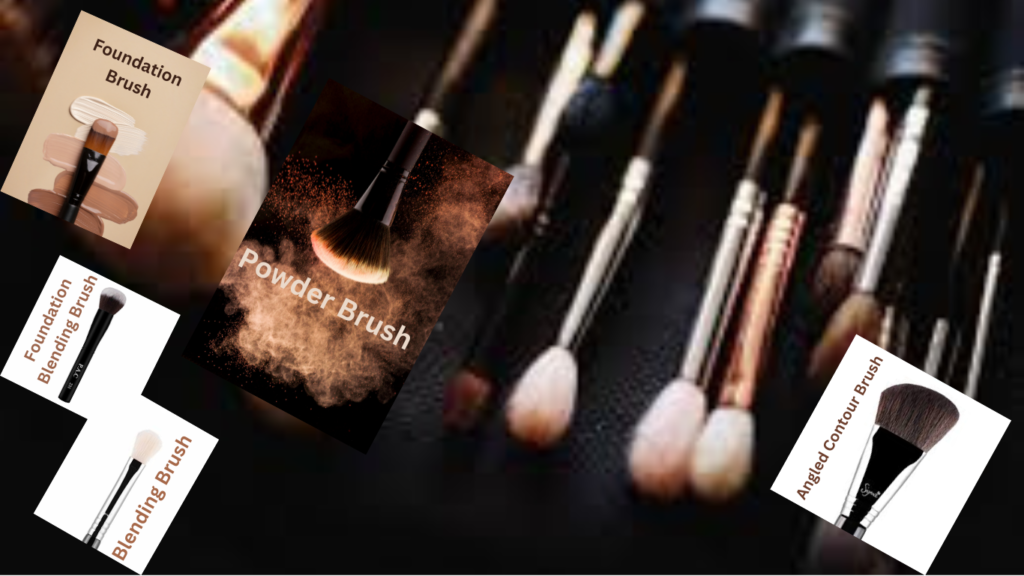
The Brush Brigade
Your journey starts with brushes—not just any brushes, but a spectrum designed for every contour, shade, and blend. A full set typically includes:
- Foundation Brush: Opt for one with densely packed bristles to create a smooth, streak-free finish.
- Powder Brush: A fluffy, large-headed brush ensures a diffused veil of powder for a set, matte look.
- Angled Contour Brush: The slanted bristles fit the hollows of your cheeks, making contouring intuitive and precise.
- Blending Brush: This is your go-to for eyeshadow. With soft, rounded edges, it blends colors on the lids seamlessly.
- Pencil Brush: For smudging liners or shadows, this pointed-tip brush is essential for a smoky eye effect.
- Precision Eyeliner Brush: A fine, pointed tip allows for an impeccably sharp wing that elevates any eye look.
Tip: Regular cleaning of your brushes not only maintains hygiene but also ensures that pigment from previous applications doesn’t compromise your perfect makeup artistry.
The Sponge Squad

Sponges, particularly the iconic beauty blender, have revolutionized foundation applications. For the art of perfect makeup, use the pointed end for hard-to-reach areas like under the eyes and around the nose, and the rounded side for stippling foundation onto larger areas for an airbrushed finish.
Unique Technique:
Dampen your sponge before use. It’ll ensure the sponge doesn’t absorb too much product and will give you a dewy application.
The Illuminating Mirrors
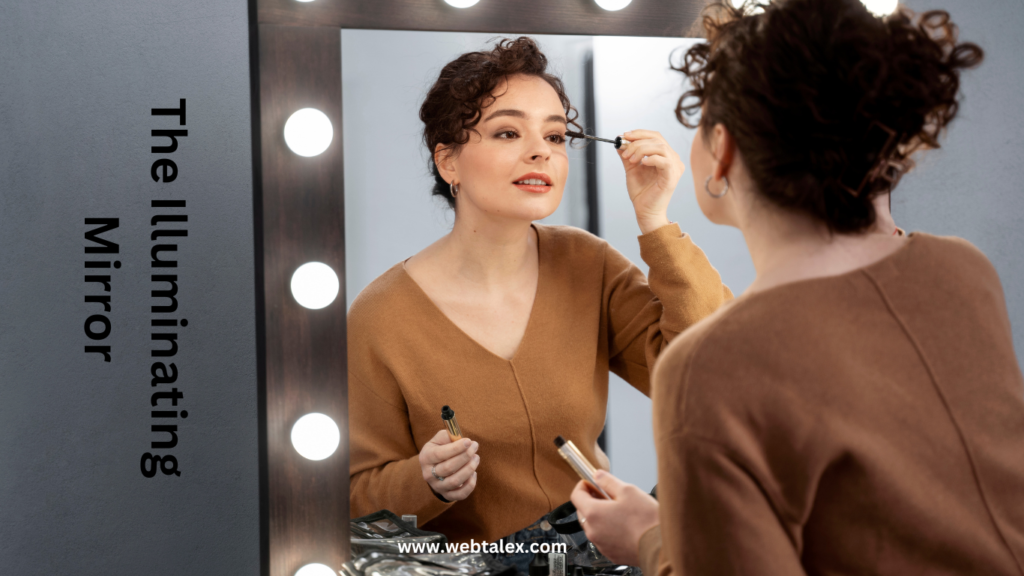
For the Art of Perfect Makeup, A high-quality makeup mirror is like a window to the soul of your makeup. Whether mounted or handheld, your mirror should provide:
- Magnification: For intricate work like eyeliner and brows, a magnifying side can be a game-changer.
- Good Lighting: Choose a mirror with built-in lighting that simulates natural light for the most accurate application.
Unique Technique: If you wear glasses, consider a makeup mirror with a higher magnification to compensate when you’re applying your makeup without them.
Enhancing Extras for The Art of Perfect Makeup
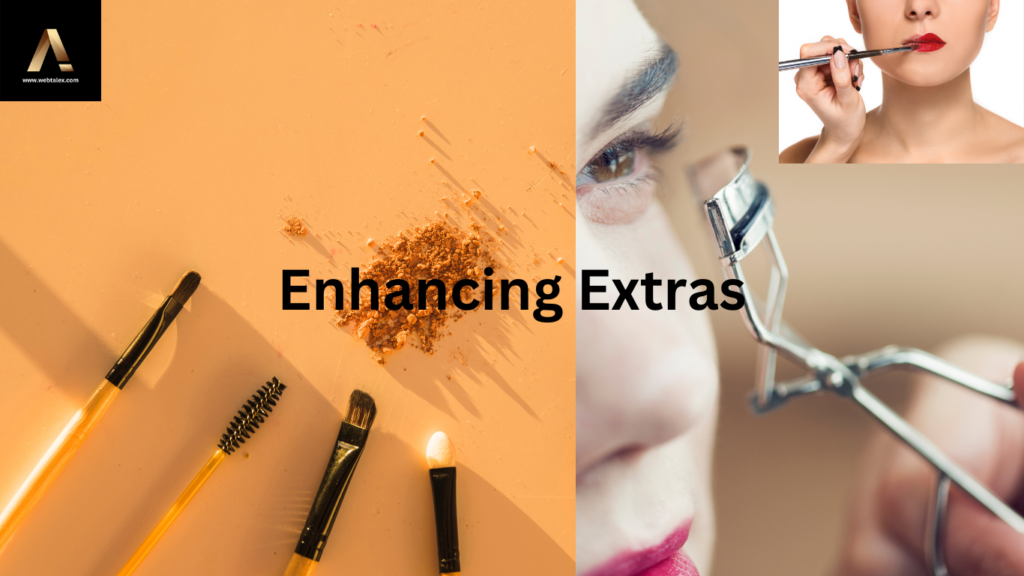
While brushes, sponges, and mirrors form the core, don’t overlook these enhancing extras:
- Eyelash Curler: To open up your eyes before mascara application.
- Brow Spoolie: Essential for grooming and shaping your eyebrows.
- Lip Brush: For precise lipstick application and to layer colors beautifully.
Tip: Always adapt the tool to the task. A smaller brush head generally offers more control for detail work, while larger ones are better for broad strokes.
Remember, the art of perfect makeup is partly skill, partly creativity, and a whole lot about the tools you wield. Select them wisely, care for them regularly, and they’ll help you achieve that flawless finish every time.
Understanding Your Canvas: Skin Prep and Care
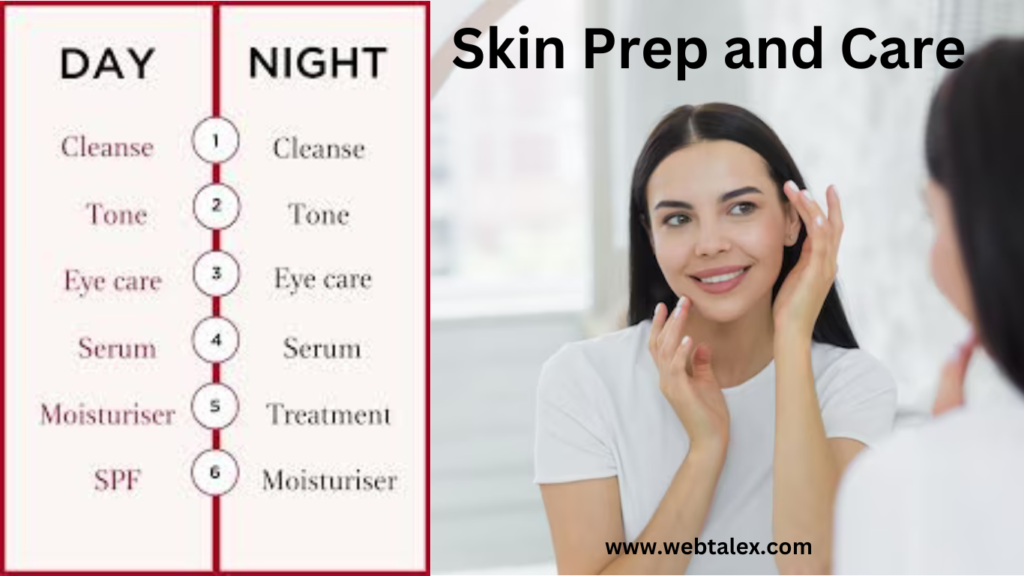
Skin Prep: The Canvas for Makeup Artistry
In the world of the art of perfect makeup, pristine skin prep is the cornerstone. Just as a painter primes a canvas before a stroke of paint, your skin requires a tailored regimen to embrace the full spectrum of cosmetic brilliance.
To begin, a thorough cleansing routine is imperative. Opt for a gentle cleanser suited to your skin type that can remove impurities without stripping away natural oils. A balanced canvas ensures that everything that comes after is enhanced.
Exfoliation is your next step.
It smooths the skin’s surface and reveals a fresh layer of cells. Whether you pick a synthetic exfoliant with AHAs or BHAs or a physical exfoliant with a fine surface, the key is control. Over-shedding can prompt bother, so limit this to 1-2 times each week, contingent upon your skin’s responsiveness.
Following peeling, a toner can refine your pores and reestablish your skin’s pH balance. It’s like setting the stage for the masterpiece to come. For those with dry or sensitive skin, hydrating toner is a godsend, preparing your skin to better absorb the products that follow.
Hydration is the next artful step.
Whether it’s a lightweight lotion for oily skin or a rich cream for dry types, moisturizer is non-negotiable. It plumps the skin, leaving it supple and ready to hold makeup in place. For an extra boost, serums packed with hyaluronic acid or glycerin can lock in moisture and impart a radiant glow.
A primer
sets the stage for makeup. It’s the bridge between your skincare and makeup, smoothing fine lines, blurring pores, and creating a grip for foundation. Consider a primer with added benefits, such as SPF or antioxidants, for added skin protection.
Unique Technique: For an ultra-smooth under-eye area, dab a small amount of eye cream before concealer. This prevents caking and creasing, maintaining a youthful and awake look throughout the day.
Final Tip: Allow each layer of skincare to absorb fully before moving on to the next. This patience pays off, as it prevents pilling and ensures each product can perform at its best.
Remember, your skin is the canvas for the art of perfect makeup. Treat it with care, prepare it with skill, and you’ll have a flawless base for any look you choose to create.
Skin type identification:
- Normal Skin: Balanced moisture; aim for products that maintain this equilibrium.
- Oily Skin: Look for non-comedogenic and oil-control options.
- Dry Skin: Hydration-rich formulations are your go-to.
- Sensitive Skin: Soothe with hypoallergenic and fragrance-free choices.
Pre-makeup skincare:
- Cleanse gently to remove impurities.
- Exfoliate weekly to maintain smoothness.
- Moisturize daily to keep the skin supple.
- Sun protection is non-negotiable, even under makeup.
Foundation of Beauty: Primer and Foundation Techniques
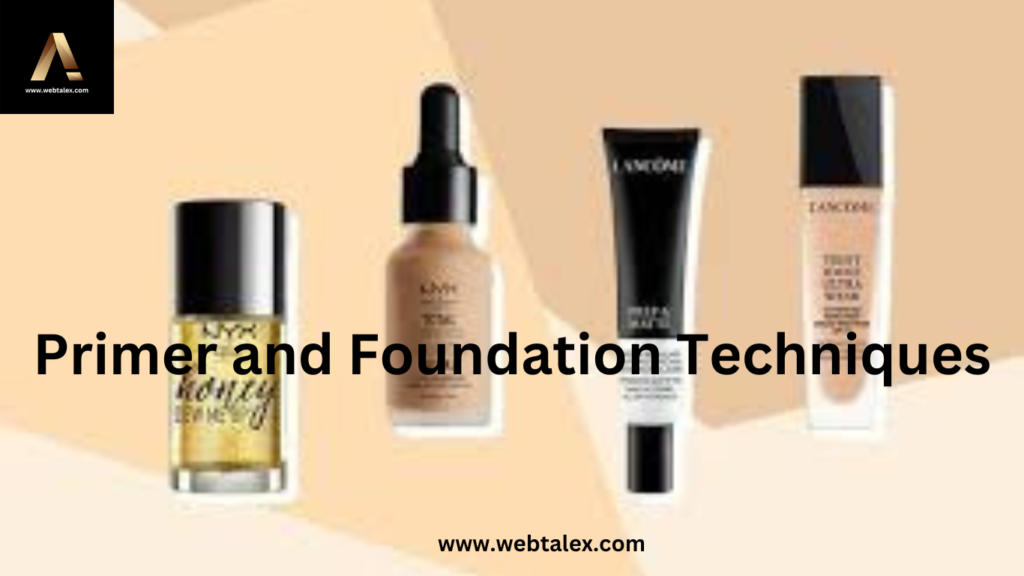
Foundation Matching and Application Techniques
In the world of the art of perfect makeup, achieving a seamless, natural-looking base hinges on finding the ideal foundation match, a fundamental step in the art of perfect makeup.
Begin by determining your skin’s undertones—are they cool, warm, or neutral? Cool undertones have hints of blue or pink; warm undertones exhibit peachy, golden, or yellow hues; and neutral is a mix of both.
When testing foundations, don’t just swatch on your hand; the skin there often differs in shade from your face. Instead, apply stripes of potential matches along your jawline and check the colors in natural light—the right shade will disappear into your skin.
Once your perfect match is identified, the application technique takes the spotlight. Here’s where you can experiment with tools and methods to achieve your desired effect:
- Using Brushes: For full coverage, use a dense brush, moving in circular motions to buff the foundation into the skin. A stippling brush, with its duo-fiber bristles, works wonderfully for a lightweight, airbrushed finish.
- Fingertips: If you’re after a more natural, skin-like appearance, your fingers can be your best tool. The warmth of your hands helps blend the foundation smoothly. Plus, you’ll have more control over building coverage precisely where needed.
- Beauty Sponges: Dampen a beauty sponge and bounce it over your skin to blend foundation. It’s ideal for a dewy finish and works well to merge the product into harder-to-reach areas.
- Unique Technique: For an even more tailored application, mix the foundation with a drop of facial oil or hydrating serum. This is especially beneficial for dry skin types, as it helps the foundation meld into the skin without clinging to dry patches.
- Final Tip: Always start with a small amount of product and build it up if necessary. It’s easier to add than to subtract, and layering thinly will prevent caking.
By mastering both shade matching and application, your foundation will not only complement your natural skin tone but also create a flawless base, making your complexion appear impeccable and undeniably artful.
Selecting the Perfect Primer:
- It should complement your skin type.
- Consider the completion you need (matte, dewy, and so on).
Foundation Application Mastery:
- Use dabbing motions for a natural finish.
- Build coverage gradually to avoid cakiness.
- Don’t forget to blend down the neck for a seamless look.
Conquering Color Correction and Concealment
Concealer Mysteries: Coverage for Blemishes and Under-Eye Circles
In the pursuit of the art of perfect makeup, concealer is your trusted ally, adept at vanquishing blemishes and erasing under-eye shadows. Mastery of this product lies in understanding color correction and the strategic layering of textures.
| Aspect | Details | Techniques/Tips |
|---|---|---|
| Color Theory for Concealers | -Green neutralizes redness -Yellow combats purple-toned shadows -Peach or orange brightens under-eye circles | Apply a color corrector before concealer for targeted discoloration correction. |
| Concealer Selection | -For blemishes: Match skin tone -For the undereye: One shade lighter | Choose shades carefully to ensure natural blending and avoid halo effects. |
| Application Precision | -Use a small, pointed brush for blemishes -Gentle patting for the undereye | Apply precisely only where needed; avoid tugging on delicate skin. |
| Setting Technique | Under-eye: Light-reflective powder -Blemishes: Translucent setting powder | Set the concealer to prevent creasing and maintain a matte finish. |
| Layering Method | Build coverage with thin layers | Avoid a ‘caked on’ appearance; maintain the skin’s natural texture. |
| Overall Effect | Concealer enhances and transforms | Achieve a natural, flawless complexion, contributing to the makeup look’s overall artistry. |
Understanding Color Theory:
- Use green to neutralize the redness.
- Apply peach or orange tones to counter dark circles.
Effective Concealer Use:
- Spot-correct with a pinpoint brush technique.
- Blend with a light hand to maintain coverage.
Eye Makeup Mastery
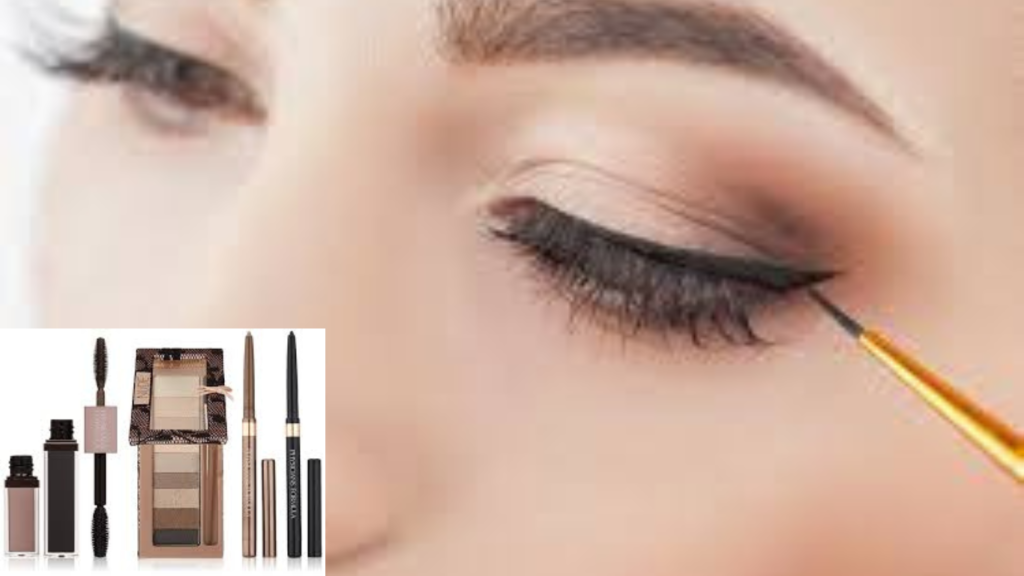
Eye-Opening Insights: Eyeshadow, Liner, and Mascara
The eyes are the focal point of expression, and perfecting eye makeup is essential to the artwork of ideal makeup. In the pursuit of the art of perfect makeup, whether you’re aiming for the smoldering appeal of a smokey eye or the bold declaration of picture strains, mastery over this area is a blend of creativity and technique.
Understanding the plethora of eyeshadow textures is fundamental. Mattes provide intensity and are ideal for developing contours in the crease, even as shimmers bring mildness and may highlight the middle of the lid or the brow bone.
| Technique/Aspect | Details | Application Tips |
|---|---|---|
| Metallics and Glitters | Ideal for drama and evening glamour | -use for special occasions -Balance with neutral makeup for harmony |
| Blending Technique | Key for seamless eyeshadow application | -Use a transition shade in the crease -Blend with a fluffy brush in windshield-wiper motions |
| Enhancing Metallic or Shimmer Shadows | Intensifying eyeshadow payoff | -Dampen the brush before application for enhanced color and shimmer |
| Creating Defined Lines | Achieving precision in eye makeup | -Use a small, angled brush with dark matte shadow or gel liner ideal for creating softer yet more defined lines |
| Halo Eye Technique | Creating an eye-catching effect | -Apply a lighter shadow in the center of the lid darker shades in the inner and outer corners -Blend for a spotlight effect on the eyes |
| Lower Lash Line Application | Completing the eye look | -Mirror top lid eyeshadow on the lower lash line -Apply sparingly for a cohesive, sophisticated look |
Ultimately, in the pursuit of the art of perfect makeup, eye makeup is not just about color application; it’s about shaping and enhancing the eyes. With patience, practice, and precision, the eyes can indeed become a captivating canvas for all manners of artistic expression.
Eyeshadow Techniques:
- Embrace the art of blending; transitions should be seamless.
- Use a primer to prevent creasing.
Eyeliner Tips:
- Steady your hand for precision.
- Understand eye shapes to optimize liner style.
Mascara Magic:
- Wiggle the wand at the base of the lashes for volume.
- Layer different mascaras for a customized effect.
Defining the Brows: Sculpting Your Ideal Arch
In the pursuit of the art of perfect makeup, crafting the perfect brows is a nuanced art that frames your face and accentuates your eyes. Our comprehensive guide dives deep into identifying the most flattering arch based on your unique face shape and selecting the ideal brow products for either a refined, natural look or a dramatic statement.
Finding Your Arch According to Face Shape:
- Oval Face: Celebrate an oval face with a softly angled arch that creates a natural lift.
- Round Face: Aim for a higher arch to elongate and add definition to a round face.
- Long Face: A straighter brow can add horizontal contrast to a long face, making it appear shorter.
- Square Face: Curved brows can soften the angles of a square face, while a defined peak at the top can complement strong jawlines.
- Heart-Shaped Face: A softer curve or rounded brow softens a pointed chin and balances the face.
- Diamond Face: Aim for curved or rounded brows to counterbalance wider cheekbones and narrow the overall face shape.
Selecting Brow Products:
- Pencils: ideal for filling in sparse areas with precision; perfect for creating a defined or natural look depending on the pressure used.
- Powders: Great for a softer, more diffused look, powders can add volume to brows without harsh lines.
- Gels: Tinted gels offer a dual function: they color the hair while setting it in place for a polished look. Clear gels are perfect for a tamed, natural appearance.
- Pomades: For those desiring a bold, sculpted arch, pomades provide high-impact color and are excellent for carving out a precise shape.
- Fibers: Fiber-infused formulations add fullness and texture to the brows, creating the illusion of natural hair.
Technique Tips for Brow Perfection:
- Mapping the Brows: Start by finding where your brows should naturally begin, arch, and end by aligning a pencil vertically from the edge of your nose to the inner and outer corners of your eye.
- Natural Fill Technique: Use short, upward strokes to mimic natural hairs and create a subtle, filled-in look.
- Defining the Arch: For a sharper arch, use a slightly heavier hand with your brow product at the peak, then blend outwards.
- Brow Highlighting: Apply a touch of highlighter or concealer right beneath the brow bone to define and lift the arch.
- Growth Encouragement: Incorporate serums or oils into your nightly routine to encourage brow thickness and health.
Final Touches:
- Brow Sealing: Seal your work with a swipe of gel to keep hairs in place and maintain their shape throughout the day.
- Regular Maintenance: Keep your ideal shape by tweezing stray hairs regularly or scheduling appointments for professional shaping.
By following these tailored techniques, you’ll be able to enhance your facial features with the perfect brow shape and product selection, ensuring your brows contribute harmoniously to the art of perfect makeup or your overall makeup look.
Sculpting and Defining: Contouring and Highlighting
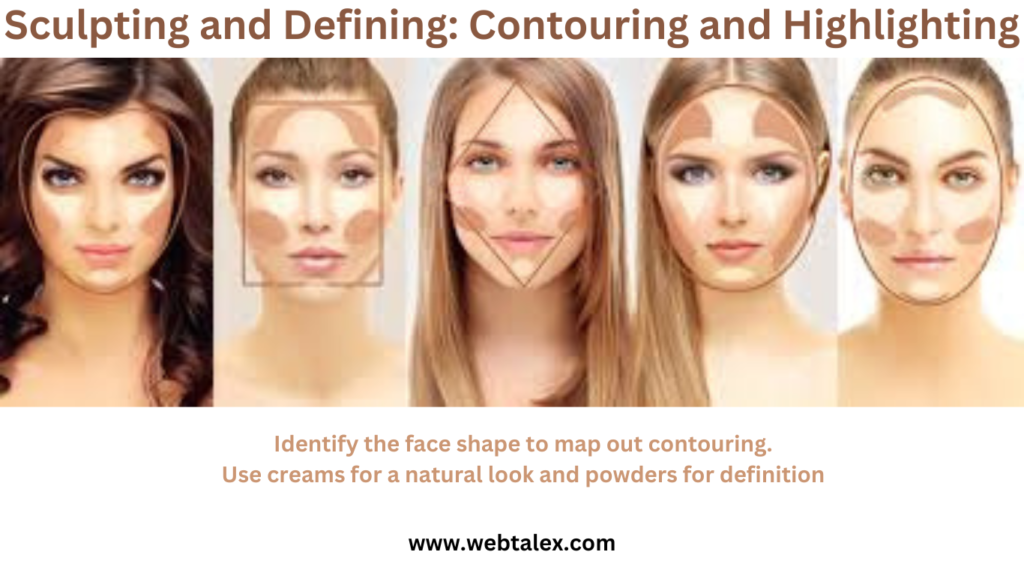
Contouring and Highlighting: Sculpting the Face with Makeup
In the pursuit of the art of perfect makeup, contouring and highlighting are akin to the brushstrokes of a skilled sculptor, capable of defining and illuminating your facial landscape. To harness these techniques is to have the power to accentuate your finest features, adding nuanced depth and radiant dimension.
For shaping, select a shade somewhat more obscure than your regular complexion; this makes the deception of shadows improve the normal forms of your face. Apply this underneath your cheekbones, at the edges of your nose, and around the outskirts of your face. The art lies in subtlety; your contour should imply a shadow, not declare itself as makeup.
Highlighting counters
by bringing light to the high points of your face. Choose a highlighter that complements your skin tone—champagne shades for light to medium skin and golden or bronze tones for deeper complexions. Dust highlighter atop your cheekbones, down the bridge of your nose, and on the cupid’s bow above your lip. The goal is a gentle luminosity, like that of soft candlelight.
Blending is indeed your mantra here.
In the art of perfect makeup, use a blending brush or a damp makeup sponge to diffuse any harsh lines, merging the contour and highlight with your base makeup. In the pursuit of the art of perfect makeup, the transitions should be seamless, mimicking how light and shadow play naturally across your features.
Unique Technique:
For a sculpted look that remains undetectable, contour with a cream product before foundation. This ‘underpainting‘ technique ensures the most natural-looking definition. When highlighting, pat a touch of cream or liquid highlighter onto the skin before setting it with powder for an inner glow.
Remember, in the art of perfect makeup, contouring and highlighting should never be stark or jarring. They are the silent narrators of your face’s story, subtly shifting the focus to where you desire it most. With practice and precision, your face becomes a canvas not just of beauty but also of light and structure.
Highlighting Hacks:
- Highlight the tops of cheekbones, brow bones, and the cupid’s bow.
- Less is more; aim for a subtle glow
A Flush of Health: Blush Application
Blush and Bronzer: Adding Color and Dimension
| Product | Purpose and Effect | Application Tips | Color Selection |
|---|---|---|---|
| Bronzer | Adds warmth, mimicking sun-kissed skin | Choose 1-2 shades deeper than skin tone Apply in a “3” shape: forehead, cheekbones, jawline Use the ‘edge of the brush’ method for precision | Based on skin tone for natural warmth |
| Blush | Creates a natural flush, enhancing youthfulness | Smile and apply to the apples of the cheeks, blending outward For a lifted look, apply slightly higher on the cheekbones | Cool undertones: pink or rosy hues Warm undertones: peach/coral shades |
Unique Techniques:
- Blush: Layer cream blush under powder blush for added longevity and depth.
- Bronzer: Use the side of the brush for a more precise application before blending.
In the art of perfect makeup, blush, and bronzer are not just about adding color but about strategic placement that capitalizes on the natural interplay of light and shadow, thus creating an illusion of depth and accentuating the inherent beauty of the face’s topography.
Blush and Bronzer
The Rosy Glow: Blush Techniques for Every Face Shape
Blush is the key to a healthy, youthful complexion. Discover how to select blush shades and apply them according to your face shape to enhance your natural beauty.
Sun-Kissed Skin: Bronzer Application for a Natural Look
Bronze shouldn’t look like a tan line; it should provide a natural, sun-kissed glow. Learn how to apply bronzer without overdoing it, achieving a radiant yet subtle warmth.
Blush Placement:
- For a more youthful appearance, apply a smile to the apples of your cheeks.
- Consider face shape for best placement.
The Finishing Touch: Lips
Lipstick Love: Perfecting Your Pout

In the art of perfect makeup, lipstick can be considered the signature of your makeup look—the element that can change the narrative of your face with a single swipe. Whether you’re drawn to the timeless elegance of a classic red or the understated allure of a nude, the application of lipstick is a deliberate and precise art.
| Step | Purpose | Technique | Tips |
|---|---|---|---|
| Preparation | Create a smooth base for lipstick | Gently exfoliate the lips to remove flakiness. Apply a nourishing lip balm and allow it to absorb fully. | Ensure your lips are not overly greasy or slick. |
| Lip Liner | Define and shape lips | Start outlining at the cupid’s bow and extend to the outer edges. Subtly overline for fuller lips. Fill in the entire lips with liner for a lasting color base. Outline your lips with a liner that matches your lipstick, or go a shade darker to define the edges and create the illusion of volume. | Choose a liner shade close to your lipstick. |
| Lipstick Application | Apply the main lip color | Start outlining at the cupid’s bow and extend to the outer edges. Subtly overline for fuller lips. Fill in the entire lips with liner for a lasting color base. Apply your lipstick in layers, blotting with tissue between applications to build up intensity and staying power. For precision, use a lip brush, especially for bold or dark shades, to ensure clean lines and an even coat. | Matte for longer wear; hydrating formulas for comfort. |
Unique Technique: After applying your first layer of lipstick, blot with a tissue and dust a small amount of translucent powder on your lips. Apply a second layer of lipstick over this for a bulletproof finish. This ‘blot and powder’ technique will lock the color in place and dramatically extend the wear time.
Lip Artistry
Pout Perfection: Techniques for Luscious Lips
Crafting the perfect pout is an art that combines preparation, precision, and the right product choices. Here’s how to ensure your lips are not just captivating but that your lipstick lasts through the day.
Setting your lipstick:
- After applying, place a thin piece of tissue over your lips and lightly dust translucent powder through the tissue. This sets the lipstick without altering the color or finish.
- For a final touch, clean up the edges with a small brush dipped in concealer to ensure a sharp and clean line.
Additional Tips:
- Avoid licking your lips, which can wear away lipstick and dry out your lips.
- If using a matte lipstick, make sure your lips are extra hydrated beforehand, as matte formulas can be drying.
- For an added boost of hydration, top your lipstick with a bit of gloss in the center of your lips, enhancing their shape and fullness.
By integrating these techniques into your lip routine, you’ll achieve a luscious, durable pout that stands out with elegance and boldness.
Long-Lasting Lipstick Tricks for an Everlasting Impression
Keep your lipstick locked in from sunrise to sunset. Dive into these tried-and-true methods for enduring lip color that resists smudging, fading, and transferring.
Prime for permanence:
- Dab a small amount of foundation or a lip primer over your lips. This neutral base helps to enhance the true color of your lipstick and extends wear time.
Touch-Up Smarts:
- If touch-ups are needed, do so by applying a thin layer only where necessary, usually the center of the lips, and avoid building up too many layers.
Lasting Finish:
- Conclude your application with a final sweep of setting spray, holding it a good distance from your face, to lock in your entire makeup look, lips included.
With these techniques at your fingertips, you’re well-equipped to create a lip look that’s as resilient as it is radiant, ensuring your smile leaves a lasting impression throughout the day.
Set for Perfection: Locking It In
Setting Your Makeup: Ensuring Longevity
In the art of perfect makeup, securing your makeup is the final crucial step to seal your efforts and extend the life of your beauty masterpiece. Properly setting your makeup bridges the gap between application and endurance, ensuring that your look stays fresh and flawless for hours on end.
| Product Type | Purpose | Application Technique | Tips and Unique Techniques |
|---|---|---|---|
| Setting Powders | Minimize shine and set makeup | Use a fluffy brush to apply translucent powder, focusing on the T-zone, under the eyes, and around the lips | Apply selectively to avoid a matte finish in drier skin types Dust lightly for a natural look |
| Setting Sprays | Create a lightweight shield; enhance makeup longevity | Mist face in an “X” and “T” pattern from an arm’s length away | Choose a formula for a dewy or matte finish. can provide additional hydration |
| Unique Technique (Combining Both) | Reinforce makeup staying power | After foundation, dampen a sponge with setting spray and press over the face | Use a fluffy brush to apply translucent powder, focusing on the T-zone, under eyes, and around the lips |
For areas that tend to lose coverage first, such as the under-eyes or the corners of the mouth, employ a targeted approach with a small, precise brush dipped in powder to combat any creasing or movement throughout the day.
Remember, setting your makeup isn’t merely an afterthought; it’s an integral part of the art of perfect makeup. With the right tools and techniques, you can ensure that your carefully crafted look remains as vibrant and impeccable as when you first applied it.
Makeup Longevity
Set for Success: Ensuring Your Makeup Lasts All Day
No one wants their makeup to slide off at midday. For the Art of Perfect Makeup, this section will reveal the secrets to setting your makeup so it lasts from morning to night.
For the art of perfect makeup, ensuring that your makeup maintains its perfection from dawn until dusk is a common concern for beauty enthusiasts and professionals alike. The secret to enduring makeup lies in both the preparation of your skin and the layering of products designed to seal your look.
Let’s delve into some key strategies and unique tips that can help your makeup stay in place throughout the day.
1. Priming is Paramount:
The initial step to longevity starts even before the foundation is applied. Using a primer specific to your skin type can significantly extend the wear of your makeup. A mattifying primer is ideal for oily skin, while a hydrating primer will benefit dry skin. For areas that tend to get oily, like the T-zone, consider using a primer with a more gripping effect to hold makeup in place.
2. Layering Liquids and Powders:
After applying your liquid- or cream-based products, set each layer with a coordinating powder. For example, use a translucent setting powder over your foundation and a tinted powder on top of a cream blush or bronzer. This technique not only adds longevity but also helps to prevent any transfer of makeup.
3. The Power of Pressing:
When applying powder, press it into the skin with a puff or a flat powder brush instead of sweeping it across. Pressing the powder onto the skin allows it to absorb excess oils and creates a more durable base that is less likely to slide off.
4. Temperature Tactics:
Warm temperatures can melt makeup, so using cooler settings on your hair dryer or finishing your skincare routine with a cold water rinse can help to tighten pores and prepare the skin for makeup application.
5. Setting Sprays: The Final Armor:
A setting spray is the final veil that locks everything in place. For added endurance, spray in layers; apply a light mist between every major step—after foundation, after powder, and once all your makeup is applied. Before applying the next layer, let the previous one dry.
6. Blotting Techniques:
Throughout the day, instead of adding more powder, which can lead to a cakey look, use blotting papers to absorb excess oil without disturbing your makeup. Blotting papers are a discreet and quick solution to maintain a fresh appearance.
7. Strategic touch-ups:
Carry a mini-setting spray or a compact powder for targeted touch-ups if you have a particularly long day or an event. Focus on areas that tend to get shiny or where makeup fades more quickly, like the nose and chin.
8. Embrace the Long-Wear Formulas:
Invest in long-wear or waterproof versions of your favorite products, especially base makeup, eyeliners, and lipsticks. These formulas are specifically designed to withstand the challenges of a full day’s wear.
By incorporating these procedures into your cosmetics schedule, you’ll change your cosmetics’ application into a tough, all-day issue. The objective is to make a wonderful look, “The Art of Perfect Makeup,” that is as sturdy as it could be magnificent, permitting you to confront the day with certainty, realizing your cosmetics are set to endure from your morning espresso to your night wind-down.
Beat the Heat: Makeup Techniques for Hot Weather
Warm weather can be makeup’s worst enemy. Discover how to keep your makeup intact with techniques and products designed to withstand heat.
- Start with a clean slate.
- Begin with a thorough cleansing to remove excess oils and sweat residue.
- Use a Mattifying Primer:
- Opt for a mattifying primer to reduce shine and create a smooth base that helps makeup adhere better.
- Lightweight foundations, or BB creams:
- Switch out heavy foundations for lighter options like BB creams or tinted moisturizers with SPF.
- Oil-Free and Long-Wear Products:
- Choose oil-free and long-wear makeup formulations to prevent sliding or melting.
- Blotting papers are essential.
- Keep blotting papers handy to dab away excess oil without disturbing your makeup.
- Waterproof Formulas for Eyes and Lips:
- Use waterproof mascaras and eyeliners to avoid smudging.
- Opt for lip stains or matte liquid lipsticks that won’t bleed in the heat.
- Set the powder strategically.
- Apply setting powder only where necessary, like the T-zone, to avoid a cakey appearance.
- Lock in with Setting Spray:
- Finish with a setting spray designed for hot weather; look for ones with temperature control technology.
- Cream over powder for cheeks:
- Use cream blushes and bronzers, as they are less likely to streak or wear off compared to powders.
- Avoid layering too much product:
- Keep layers to a minimum to reduce the chances of makeup becoming heavy and melting away.
- Touch-up Kits:
- Carry a small touch-up kit with essentials for quick fixes on the go.
- Stay Hydrated and Refreshed:
- Spritz a hydrating mist throughout the day to refresh your makeup and cool down the skin.
By integrating these techniques into your makeup routine, you can help ensure your look remains as vibrant and polished as it was in the cooler morning hours, despite the heat.
Setting Your Makeup:
- Translucent powders prevent shine.
- Setting sprays can offer hydrating or mattifying benefits.
Concealing Blemishes: Artful Techniques for a Clear Complexion
- Color Correcting First:
- Use a color-correcting concealer to neutralize the redness of blemishes; green is typically effective for red spots.
- Thin Layers Over Thick Coverage:
- Apply concealer in thin layers, building coverage gradually, to avoid a cakey look.
- Precise Application:
- Use a small, pointed concealer brush for precision when applying the product directly to the blemish.
- Non-Comedogenic Products:
- Choose concealers labeled non-comedogenic to avoid clogging pores further.
- Pat, don’t Rub:
- Gently pat the concealer onto the blemish to blend, rather than rubbing, which can remove the product or irritate the skin.
- Setting with powder:
- Lightly dust translucent setting powder over the concealed area to set the product without adding bulk.
- Blemish treatment underneath:
- Apply a spot treatment before makeup to help reduce inflammation and treat the blemish throughout the day.
- Oil-Free Foundation:
- Use an oil-free foundation to prevent additional shine and provide a matte finish that can help conceal imperfections.
- Hydration is Key:
- Ensure the skin around the blemish is well hydrated to prevent the product from clinging to dry patches.
Beauty Beyond the Day: Nighttime Skincare
Makeup Removal Mastery:
The final brushstroke in the art of perfect makeup is its removal. Just as important as application, proper makeup removal prevents breakouts and skin irritation. Develop a routine that is gentle yet effective, ensuring your skin’s health and readiness for the next makeup application.
- Oil-based removers dissolve stubborn products.
- Double cleanse to ensure all makeup is removed.
Advanced make-up Techniques
- Embrace the Spectrum: Integrate bold colors into your look by starting with a vibrant eyeliner or a single statement shadow before building up to full-lid boldness.
- Blend with Balance: When using bold shades, blend edges into a neutral transition color to avoid harsh lines and create a wearable gradient effect.
The Smoky Eye: A Step-by-Step Guide
- Layering Shades: Start with a dark pencil base to intensify the powder eyeshadow that follows.
- Blending is key. Use a fluffy brush to blend out the dark shades with lighter tones for a seamless, smoky gradient.
Graphic Liner Looks: Making a Statement
- Steady Hand Technique: Rest your elbow on a table for stability when drawing graphic lines for more control.
- Tape Trick: Use a small piece of tape as a guide for winged or angled liner looks to achieve sharp, precise lines.
Makeup for Different Occasions
From Day to Night: Transforming Your Makeup Effortlessly
- Intensify the Eyes: Darken the crease or add a shimmer to the center of the eyelids to quickly elevate the eyes for the evening.
- Layer Lip Color: Apply a deeper lipstick shade over your daytime color for a bolder lip without a full redo.
Bridal Beauty: Makeup for Your Special Day
- Waterproof Formulas: Use waterproof mascara and eyeliner to ensure your look withstands the emotions of the day.
- Setting Sprays: Invest in a bridal setting spray that promises extra hold for makeup that lasts from vows to the last dance.
The Professional Edge: Makeup for the Workplace
- Neutral Palette: Stick to neutral eyeshadows for a subtle definition that’s office-appropriate.
- Soft Contouring: Employ light contouring for a sculpted yet understated look that enhances without overpowering.
Simple Party Makeup Guide: Master a Flawless Look
Pros and Cons Table
| Pros | Cons |
|---|---|
| Enhances natural beauty | Time-consuming |
| Can be tailored to individual style | May require practice to perfect techniques |
| High-quality tools can improve results | The initial cost of investment in products |
| Proper techniques can ensure longevity | Overdoing it can have the opposite effect |
Conclusion:
The art of perfect makeup not only enhances your natural beauty but also empowers you to confidently express your style and creativity. As we conclude our exploration of the art of perfect makeup, remember that at the heart of makeup artistry is individuality.
Techniques and tools will evolve, but your unique expression through makeup remains timeless. Celebrate your features, play with colors and textures, and never forget that makeup is an art—your art.
- Understanding your skin type is foundational to mastering the art of perfect makeup.
- Quality tools and products tailored to your needs will enhance application and results.
- Focus on perfecting a natural base to set the stage for the rest of your makeup.
- Embrace subtlety with eye makeup to maintain timeless elegance.
- Use blush and highlighter to add a natural, healthy glow.
- Lip precision and color balance are the keys to a polished look.
- Employing techniques for longevity ensures your makeup lasts all day.
- Effective makeup removal is essential for skin health.
FAQs
How do you do perfect makeup?
Perfect makeup is achieved through proper skin preparation, understanding your unique facial features, and applying products in a way that enhances your natural beauty.
It involves steps like priming, applying foundation matched to your skin tone, concealing imperfections, setting with powder, adding color through blush and bronzer, defining the eyes, and choosing the right lip color. Technique and practice are crucial, as is layering products correctly to build a seamless finish.
What do you need for perfect makeup?
For wonderful cosmetics, you really want the right instruments and items customized to your skin type and tone. Basics incorporate quality groundwork, establishment, concealer, setting powder, becoming flushed, eyeshadow range, eyeliner, mascara, lip items, and setting shower.
Good lighting and a set of brushes or sponges for precise application are also important. Don’t forget skincare products to prepare your skin before the art of perfect makeup application.
How do I get perfect makeup skills?
Perfecting makeup skills comes with practice, study, and experimentation. Watching tutorials from trusted makeup artists, attending workshops, and practicing techniques can help improve your skills. Understanding color theory and makeup formulations and staying updated with trends are also beneficial. Regularly practicing and not being afraid to try new looks will develop your skills over time.
What makes flawless makeup?
Flawless makeup is the result of several factors: starting with well-prepared skin, using high-quality products suited to your skin type, and applying them with the right techniques. It also requires attention to detail, such as blending thoroughly and setting your makeup properly.
Consistency in skincare routines contributes to a smoother canvas for makeup, while the right tools can provide the precision needed for a flawless finish.
Q: Can these techniques be used with any makeup brand?
Yes, these techniques are universal and can be applied using any makeup brand that suits your skin type and color preferences.
Q: How often should I clean my makeup tools?
It’s recommended to clean your brushes at least once a week to prevent bacteria buildup and ensure the best application.
Q: Is it necessary to use a setting spray?
While not necessary for everyone, a setting spray can help extend the wear of your makeup, especially in hot or humid conditions.
References
- “Makeup Manual: For Everyone from Beginner to Pro” by Bobbi Brown
- “Face Forward” by Kevyn Aucoin
- The International Journal of Cosmetic Science for technical insights
- Sephora’s “Beauty Insider” community for product reviews and trends
Remember to consistently update the content with the latest research, studies, and trends in makeup, and keep the focus keyword “The Art of Perfect Makeup” naturally integrated throughout your article for the best SEO results.
Related Articles:
- 60 Skincare Myths Supported by Scientific Evidence – webtalex.com on Revolutionize Your Skincare Routine: The Ultimate 360-Degree Guide
- 60 Skincare Myths Supported by Scientific Evidence – webtalex.com on “Best Healthy Hair Strategies for Lustrous Locks 2023-2024”
- 60 Skincare Myths Supported by Scientific Evidence – webtalex.com on Glowing Skin Mastery 2023: 10 Secrets for Radiance!
- 60 Skincare Myths Supported by Scientific Evidence – webtalex.com on Achieve Radiant Skin in 7 Days
- Achieve Radiant Skin in 7 Days – webtalex.com on Glowing Skin Mastery 2023: 10 Secrets for Radiance!

As the dedicated voice of Webtalex.com, I’m committed to delivering the latest and most inspiring content in beauty and health. I aim to keep you informed on the newest trends and holistic wellness, helping you look and feel your best. Join me for insightful beauty techniques, wellness tips, and much more to enrich your lifestyle.